Friday 16 December 2016

Creative Play - Presenting our final piece


Today we presented our final piece for the Into to Creative Play module, and I feel as though we done so successfully. For the setup, we wanted to have the video projected above our physical piece which was placed upon a table. We had some issues during this phase, as it was difficult to have both pieces visible to the audience due to the placement of the projector, so next time we will definitely put more thought into the presentation prior to the event, however after altering the placement we overcame this issue, and I feel we shown the work in the best possible way. Though we sometimes needed to be asked questions during presenting to get ourselves to speak, we still managed to get across our ideas and evaluation of the piece successfully, and the feedback was constructive and appreciated.

I think we took a few risks during this project in the spirit of creative play. For example, instead of sticking with our initial idea to just present our work on boards, we expanded it further by not only creating a more unique and interactive way of presenting our work, but also producing a video along side that, which is something that I’m very glad we decided to experiment with, as I feel that became the centrepiece for our project. Making models of things is something that no-one from my team had much experience with, hence the way we were originally settling on presenting our work on boards, but I feel due to all the experiments and prototypes which we created, we became a lot more experienced in the matter and I think the development of the piece shows this. Despite wanting to take risks, we also ensured that each team member had a task which utilised their unique talents, in order to make the final piece as good as it could be, for example Alice used her talent with watercolours to produce the traditional artwork, I used my digital design skills to produce the modern artwork, and Juntong used his knowledge of editing software to start the production of the video. I feel as though we all contributed to the ideas generation phase of this project, however as I previously mentioned, we were purposely put into groups with two others with contrasting work styles, and those stayed true throughout the topic, as Alice was classed as more of a creative type, and I was one who preferred to be told what to do, which is why Alice contributed the most during the ideas generation phase, and me and Juntong took more of a role during the building of the product.

The brief I feel was met as the theme of old and new was pretty much the founding concept for our project, we added a slight interactive element through the sound and the way in which the piece leads your eye from the jungle to the modern city, we created a physical product, and energy is shown during the transitioning phase of the video. If we were to improve on any element of the piece, I think my group would all agree that we could have made the interactive element more apparent and also altered the scale of the model, as I feel it was small, especially when placed below the projection of the video, however this was prevented due to the size of card on offer. Overall though, I am very satisfied with our result, and the other displays were also very well done.

Tuesday 13 December 2016

Intro to Creative Play Update

Since last weeks session, I have successfully played around creatively in my video editing software with the video of the pan through our art, and have produced an outcome which is superior to the original in my opinion. Below is the sketch which I made for the original idea for the video. 


I started off by having the idea to redraw/create each first piece from each time period in the style that came before it, therefore we could have each new time period fade into each other, thus showing a more gradual progression between each period, for example, the first piece from the traditional artwork will be redrawn out but instead all the positive space is occupied by a collage, the same as the forest scene. I experimented with this, but after putting it into a video, I concluded that it didn't work, as the silhouettes of the buildings are vastly different and therefore didn't blend in well to each other. Below is the original drawing by Alice (a group member), with the silhouette she created gradually fading to the jungle collage to the right, which in my initial idea would take the place of the first image from the traditional period.

After concluding that I didn't like that idea, I instead played around with other methods of making each period blend in with each other better. I eventually came to the idea that would act as a base for the final video after realisling that as the buildings are panning across the screen, the buildings are in theory getting more and more recent in history. From this, I had the idea that I could have all three pieces from each period loop each other, with the speed of the movement increasing rapidly until the movement becomes nothing more than a blur, thus allowing me to subtly fade in the following period over the blur, and having the new set of artwork slow down to then repeat the process with the following set of artwork. I liked this idea, as it still clearly showcases all of our artwork, but also makes more sense with the context of the piece, as when the pan speeds up, it represents progressing quickly through time, and overall is a lot more effective than the original video. Below is the final video - 


This will be played in loop above the model that we made previously when it comes to presenting our outcomes. The sound was added by another of my group members using audio files from 'Salford Soundsnap', and although I am very disappointed that I didn't utilise Foley to create custom sounds (as I really enjoyed that during our experimentation), I think that the sounds which were collected help portray the time period that the are overlapped over. After at first being hesitant to experiment further with the video, I am so glad I took the risk, as playing with the software allowed me to create a much more pleasing outcome. Below is a screenshot from my editing software showing how I made this video.


This week Alice also managed to finalise our group casebook, which shows all our ideas and work throughout this group project, and we have tidied up our model. 

Saturday 10 December 2016

Intro to Creative Play - Week 11

After finalising our ideas last week, we have been since been creating all the assets needed for our final product. At home I managed to finish my modern city scape, and I am pleased with how it looks. I used a digital illustrating software to ensure a modern-looking design, relating to the time period itself, and kept to a blue colour scheme so that each segment has its own unique colour scheme, as the forest consisted of mainly vivid greens, whereas the traditional segment had greys and blacks. I tried to give each building a quirky and cartoonish design, which not only creates a juxtaposition between the other styles, but also makes the piece look more interesting, as if I gave all the buildings a realistic square geometric based design, the final piece I feel would look uninspired and bland, when compared to the interesting ideas and art styles of the previous two. Many of these buildings were my own interpretations of famous buildings, most notably The Gherkin from London, but the majority were fabricated out of my own imagination with help from a mood board that I created, using both real world images, and from futuristic cartoons such as Futurama, in order to really push the modern theme. I made these three A3 sheets long, in accordance to the other time periods.


One of my other team members produced the artwork of her chosen time period of traditional/Victorian, and she produced them suitably using traditional methods, and I think that the outcome was very appealing.


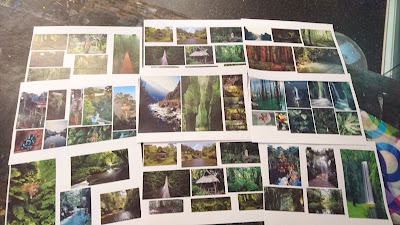
These are the final collages that we used for the jungle segment.


Now that we had all the artwork ready, our team started to experiment the best ways to make the stand that we mocked up last week, making boxes out of various materials to find the sturdiest. Eventually we found the ideal paper, which had gloss which made the boxes look more polished, and held up very well. Unfortunately, there this type of paper wasn’t available in the size that we required to make the stand, however we overcame this by producing six separate 42cm x 9cm x 7cm boxes and stacking them on top of each other to make the different levels. Below are the box mock ups, the net for the final box and what the final base came out like.


After we got that out of the way, it was then time to present the final pieces on them. This is where we came into some trouble, as printing these designs on one A3 piece of card and placing them across the 42cm long base, caused the designs to be very small, and there is no way that they would stand out at that size. We resolved this issue by only using two of the three designs for each setting, which enabled us the print them at a larger scale, and therefore be more noticeable. We cut around each of the cityscapes so that you can clearly see behind them.


I am pleased with how this has turned out, though the only thing I was uncertain about was the lack of each layer overlapping the one behind it, in order to get more of a sense for three dimensions and making the very different designs blend together more, and make the observer feel as though they are a singular piece. This was only a minor issue however, as there is a slight overlap, and overall I think the piece looks very presentable and is a unique way of attacking the brief. At first we were disappointed that not all of our artwork was going to be on show, but then we realised that all of the left over pieces would be shown on the video, which will be projected above our display. The video was also made by one of our team members during this week’s session, and though we managed to accomplished what we set off to do (which was a pan through all our artwork), we realised that the final result was bland, and the different art styles didn’t blend well and the change from forest/traditional, traditional/modern was too abrupt. Because of this, during this weekend I will experiment with alternate ways of making the pieces blend better together on my video editing software. This will be a good way to experiment further with digital design, and take more risks by playing creatively with the effects on offer. The soundscapes were also created this week. I will post the final video here when it is complete

Again, I feel like our team have made good progress, and all now that is left to do is tidy up our display a bit, and put the video together. I am highly anticipating the final result.

Friday 9 December 2016

I have successfully recreated all four of the bouncing balls exercises in the stop motion room, one of which has additionally been made within Maya. I was very disappointed with how my minimalist research on these objects negatively affected my first attempt at these exercises, so I was hoping that my primary and secondary research (as shown in a previous blog post) would help make a better outcome. The main difference between these versions and the previous ones, is that fact that the whole of the objects movements are recorded until they come to a stop, thus showing the whole process and making it easier to distinguish each object, as they all stop in very different ways.

Ping Pong Ball


This is my ping pong ball animation. I tried to capture the light and small properties of the ping pong ball by making the movement quick, keeping more of a constant speed than most of the other objects, however not without totally ignoring the principal of 'slow in slow out', thus still indicating the forces of momentum and gravity. I am very pleased with how this animation has turned out, as I feel I would be able to assume the object by nothing more than the video, something I know I definitely would be unable to do with the original.

Bowling Ball


As I have mentioned previously, the bowling ball is by far the easiest to capture the movements of, due to the fact that it's properties are vastly different from any of the other objects, and for this reason, my initial animation was satisfactory in my eyes, however I still felt the need to remake it, as I thought it still could have been better. In this version, I gave the bowling ball more of a roll at the end, as a real bowling ball would do. The heavy and hard nature of the bowling ball was indicated by it's gradually increasing yet quick decent, and lack of bouncing after the initial contact.

Balloon


On my previous balloon animation, I knocked the camera by accident midway through the making of, therefore the final project had a wobble, which made the whole video look amateur and messy. I managed to prevent that this time, and also feel I have vastly improved upon the motion itself as well. In order to portray the very light feel to the balloon, I made sure that the motion was slow, and mostly remained at a constant speed, only speeding up slightly before and after it hits the ground. This is because, due to its weight, gravity would not have as much of an affect on it. As a balloon is also not perfectly circular, it isn't always going to progress in the same direction, which I attempted to show in my animation by having the arch alter from long but low and short but high after each bounce.

Beach Ball


This is my beach ball animation. This was one of the hardest to produce, mainly because the motion shares similarities with the ping pong ball, therefore it was difficult to make it stand out as a beach ball. During my research, I discovered that due to the increased size but still relatively light weight of the beach ball, there will be a lot more emphasis on the 'slow in, slow out' principal during each bounce, which I believe I have shown through my animation. It would also likely bounce higher. As mentioned in the research, the video that I used for reference had the ball bounce off of another object, which I felt would be suitable to incorporate into my animation, thus giving me a better understanding of the properties of the beach ball.

Overall I am very satisfied with the progress that I have made on my stop motion animations, as the quality is without a doubt improved, and it goes to show how essential research prior to the making of is. These Exercises have helped me to understand the importance of observing, as little things such as a ball bouncing would be benefited greatly when animating by observing the object itself, in order to keep some realism and therefore believability into your work. I didn't enjoy creating these as much as I did my block interaction, as I felt I wasn't getting my own ideas across and was instead just focusing on accuracy, but I still see the importance and still found some enjoyment out of creating them.

As mentioned, I also selected one of these balls to re-animate in Maya, so I chose the ping pong ball, as I felt that was my most successful one. I followed the same bar sheet as I used with the stop motion version, thus ensuring the same or similar motion. I found this a lot easier than I did in the stop motion room (as always), as I can alter arcs, heights etc. at will.


Saturday 3 December 2016

Intro to Creative Play - Week 10

I feel as though our group made good progress in this week's creative play session. We have slightly altered our plan for the final product, as we have figured out a way to make a more physical, interactive and appealing display, than just our artwork hung up on some black boards. This idea was to have a stand, where each time period will be elevated above and behind each other with their backgrounds cut out, therefore still showing a progression through time, but in a more effective and appealing way. The idea of having the more modern periods built above the periods that came before it was partially inspired by underground cities such as the lost city in Edinburgh, and the fact that sometimes we build upon traditional buildings and areas. We made a mock-up of what we plan our piece to come out like (inspired by the rapid prototyping sessions) -


The jungle aspect will be aligned along the bottom, the traditional will be in the middle, and modern on the top, as represented by the colours on the mock-up. We have decided to reduce the amount of pieces per time period down to 3 each, therefore we can scale them up along with the stand, and leave time to work on other aspects, such as the sound and video, which will still be shown as planned in the previous update.

During this session, we also managed to get three more of our jungle collages done, which was done before we came to the agreement that we only needed three. However this means that we can choose the best from the ones that we have created.


I think that we have come to some good conclusions, and I will produce my part of the modern city theme and upload them here when they're done.


Here is my first attempt at the weighted bouncing balls stop motion exercise. Due to the fact that next to none research was carried out for this exercise, I was very displeased with the outcome, and knew straight away that I needed to better understand the forces and properties of all four of these before giving it another try. So, by using both primary and secondary research, I have come up with the following.

Ping Pong Ball


Due to the fact that I was severely unhappy with my ping pong ball animation, I captured my own primary research video footage of a ping pong ball bouncing. Using my editing software, I was then able to note down at what frame each bounce occurs, and at what frame the ball reaches its highest point, here is the list that I created -

1st bounce – 0.10 frames (Peaks at 18 frames)
2nd bounce – 1.0 frames (1 second) (Peaks at 1.06 frames)
3rd bounce – 1.13 frames (Peaks at 1.19 frames)
4th bounce – 2.0 frames (2 seconds) (Peaks at 2.04 frames)
5th bounce – 2.10 frames (Peaks at 2.14 frames)
6th bounce – 2.19 frames (peaks at 2.23 frames)
7th bounce – 3.03 frames (3 seconds) (peaks at 3.06 frames)
8th bounce – 3.11 frames (peaks at 3.14 frames)
9th bounce – 3.18 frames (peaks at 3.21 frames)
10th bounce – 4.0 frames (4 seconds)

(After the 10th bounce, the ball continues to bounce rapidly and roll for another 2 seconds)
The whole process – 6 seconds (8 including pauses)
Then to get a better feel of the weight of the ball, I then digitally sketched out the motion that the ball takes in the video. This will help me understand the distance and heights reached after each bounce. This is also on shown over the top of the video above.


From all this research, I have created the following bar chart, with all the bounces and peaks perfectly aligned with the key frames –


Balloon


I was also displeased with my ping pong ball animation, so once again I captured my own primary research video footage of a balloon bouncing. Due to the fact that this is an oddly weighted balloon, due to a light on the inside, I have very slightly altered the speed of the video to better replicate the pace of a real balloon. Here are the frames mapped out as was done for the ping pong ball -

1st bounce – 0.23 frames (Peaks at 1.13 frames) (1 second)
2nd bounce – 2.01 frames (2 seconds) (Peaks at 2.10 frames)
3rd bounce – 2.24 frames (Peaks at 3.08 frames) (3 seconds)
4th bounce – 3.16 frames (Peaks at 3.24 frames)
5th bounce – 4.06 frames (4 seconds) (Peaks at 4.12 frames)
6th bounce – 4.18 frames (peaks at 4.23 frames)
7th bounce – 5.03 frames (5 seconds) (peaks at 5.06 frames)

(After the 7th bounce, the balloon continues to bounce softly for another second)
The whole process – 6 seconds (8 including pauses)


Here is the final bar chart, once again with all the bounces and peaks perfectly aligned with the key frames – 


Beach Ball

As I was unable to obtain a beach ball, I relied on secondary research to work out how a beach ball bounces. I found a very useful YouTube video which is very similar to the videos I myself produced. This clip is also useful because it shows the ball making contact with an object and bouncing back, which is interesting because it helps me get a better understanding of how energy and momentum is transferred/lost, which I will attempt to recreate in the stop motion room.


https://www.youtube.com/watch?v=6Rdq_umMifo

1st bounce – 0.11 frames (Peaks at 19 frames)
2nd bounce – 1.3 frames (1 second) (Peaks at 1.09 frames)
3rd bounce – 1.13 frames (Peaks at 1.21 frames)
4th bounce – 2.03 frames (2 seconds) (Hits object at 2.07)
5th bounce – 2.11 frames (Peaks at 2.15 frames)
6th bounce – 2.17 frames (peaks at 2.21 frames)
(After the 6th bounce, the ball continues to bounce very subtle and rolls for roughly another two seconds)

The whole process – 6 seconds (8 including pauses)

Bowling ball

Unlike all the others, I was actually pleased with how this one turned out, possibly because the weight and size of a bowling ball is so vastly different from all the other balls that it is easily distinguished. I will still redo this however, as I can still see improvements being made. Again, I was unable to obtain a bowling ball for reference, but there is a video which perfectly demonstrates it (The bowling ball doesn't come up until 2:33)

https://www.youtube.com/watch?v=KRVhtMxQWRs

Here is the bar sheet which I created after watching that video -


Hopefully, after all this research that I have carried out, I will make a much better outcome next time that I am in the stop motion room, I will post the updated and hopefully improved version on here when it is finished.